Our theme this month is autumn/back to school. Very easy decision for me as both our kids graduated some years ago and we haven't got any grandchildren around us, excited about school. For those of you who live near vineyards, like me, the autumn means wine tours and special dinners offered at vineyards. Grape leaves turn the most amazing copper and gold shades during this season and the vineyard restaurant offerings usually feature the local produce paired with their vintage wines.
I have a friend who often hosts wine and cheese get togethers so I made this as a hostess gift to be given when we go for dinner in a couple of weeks (as well as a bottle of course!!!) It is not a standard size (a bit larger than 5x6.5) but this doesn't matter as it will be hand delivered. It wouldn't mail very well anyway as the two pockets are 1/4" each, equally a 1/2' depth.
Front Cover

This is front cover. Everything you see here is from Crafty Secrets "Wine Lovers". The only change I made to the scene is I painted the clouds with acrylic white paint instead of using the clouds as they were originally drawn. The slab of cheese has the cutest little mouse peering out of a cheese hole bottom centre but he didn't work with my theme so I covered him up with the grape cluster. I just know he's under there thinking "the indignity of it all" or maybe he's appreciating his privacy so he can carry on eating the rest of the cheese! Everything in this project is coloured with copics except the forementioned acrylic clouds.
Inside Pockets


This is the inside of the folder. Each pocket is 1/4" deep, the left pocket holds the wine glass ID tags and the right pocket holds the invitations. Again everything you see here is part of the "Wine Lovers"
stamp set. The wine bottle on the front cover is the same one used for the bottle border, just sized down.
Hooray for digital!
Tutorial
A few people have asked me what exactly I mean when I say "flip it over and take a stylus to the back"
There are no secrets here my friends, that is literally what I do but the difference comes by what stylus you use and the glue you use to adhere your 3D item to your project. I use Sizzix "Susan Tierney's" tools created for flower molding. You can see from this picture the stylus has a very large ball. Why this

is necessary is that you can work the back to the point where you can take a flat circle and create a bowl without leaving any scratch lines like you would with a smaller stylus. With the bottle I wanted a

When you use copics it's easy to use a stylus on the back. The reason parts of an object are light is that they project into the light further and parts are darker because they recess. Because copics bleed through the paper you can see where the light shades are and take a stylus to them. For example the grapes, when you turn the coloured grapes over you can see a bunch of dark circle so you press in on the centres. If you don't use copics you can indent on the right side and then turn it over and push out the indentation the other way.

The next challenge (if you are mailing) is to make sure all this dimension you've just created doesn't flatten. There is only one glue I have ever been happy with. "YES" is a paste glue that keeps its shape with no shrinkage when it dries. It is also a very strong adhesive.

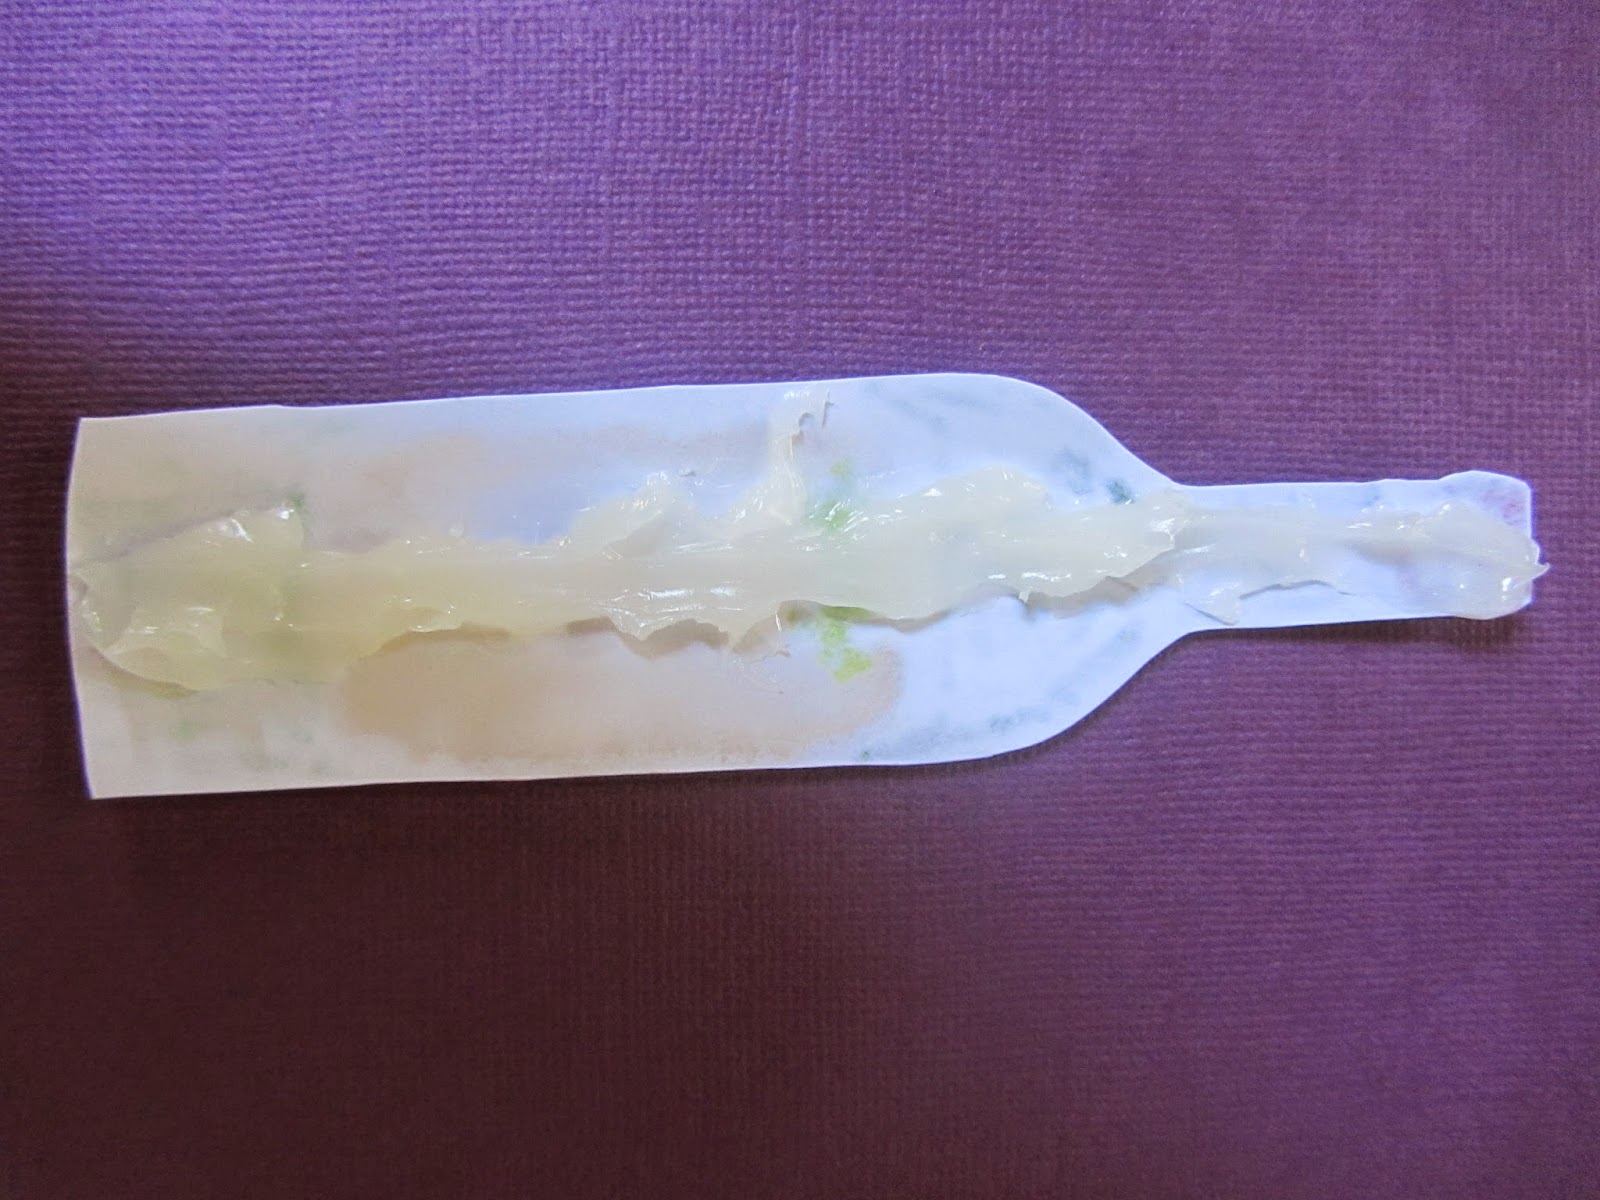
You are looking at the back side of the wine bottle with enough glue so it will hold it's shape. For this project I used this technique on the bottle and glasses on the front cover, the slab of cheese has indents, and the three large clusters of grapes.
“Now it’s your turn!
Visit each of the design team blogs listed below. Then create a NEW project of your
choice featuring Crafty Secrets product and link it up to the blog (http://heartwarmingvintage.blogspot.com/)
no later than 11:59PT, Sunday, August 17th. You do not need to
follow this month’s theme to play along.
If you do not have any Crafty Secrets goodies, check the FREE DOWNLOADS
located in the sidebar of the Crafty Secrets blog. Be sure to link to the Crafty Secrets Blog in your post, and
let us know what Crafty Secrets product you are using in your project. One lucky
player will be randomly selected to win a $50 shopping spree in our online
store. Each player who
participates will receive a $6 credit to the online store. We’ll be popping by to leave you some
lovely comments on your blog post, too. Thanks for playing along, and good
luck!”
Crafty Secrets Design
Team
Kathy Clement, DT Leader http://www.kathybydesign.com
Darlene Pavlick, Dar’s Crafty Creations http://darscraftycreations.blogspot.com/
Diane Hover, Nellie’s Nest http://www.nelliesnest.blogspot.com
Elizabeth Lincoln, Paper Passtimes http://paperpasstimes.blogspot.com/
Gloria Stengel, Scraps of Life http://gloriascraps.blogspot.com/
Melody Clement, Paper Melody’s http://papermelodys.wordpress.com/
Michele Kovack, Thoughts of a Cardmaking Scrapbooker http://chelemom.blogspot.com/
Shantaie Fowler, Inking Pink http://www.inkingpink.com/
Sheila Rumney, Sheila Rumney Design and Photography, http://www.sheilarumney.com/
Thanks so much for visiting me at Paper Pass Times
Cheers,
Elizabeth
WOW!!! This is awesome Elizabeth and totally amazing! Thanks for wonderful inspiration and GREAT TUTORIAL! I've certainly learned something new from you today ... thanks again! Happy Day!
ReplyDeleteThis is such fun, fabulous project and your tutorial is wonderful. Thanks for the great tip on the YES! glue. I'm going to have to look for that!
ReplyDeleteCheers indeed! wine and cheese? yes please!
ReplyDeleteLove all the colors in your project! Great tutorial!
ReplyDeleteWhat a great hostess gift! I do not drink wine, but I love the wine country and vineyards and such in the fall. I confess, that I am imagining that little mouse behind the grapes, just waiting for his chance to peek out! hee hee
ReplyDeleteA wonderful hostess gift and perfect for the occasion, she is going to LOVE it!! A great tutorial and now I need to get me some "Yes" glue!! So creative and fun!!
ReplyDeleteWhat an awesome gift - thank you for the tutorial!
ReplyDeleteWow, really fun project Elizabeth! I would love to visit wine country in the Fall. Someday......
ReplyDeleteThanks for the inspiration!
Oh my! What a gorgeous hostess gift! That stamp set has been on my radar for awhile. Thanks for the tutorial and and "Yes" glue tip.
ReplyDeleteOh my! What a gorgeous hostess gift! That stamp set has been on my radar for awhile. Thanks for the tutorial and and "Yes" glue tip.
ReplyDeleteElizabeth, what am amazing collection! Such exquisite work! I have a dear friend with a small vineyard here. I must show her this!
ReplyDeleteThank you, too, for this well done tutorial. I will most certainly be on the lookout for "Yes." Sounds like something I must add to my crafting stash.