SPRING

I printed the image from "Spring Chicks" and coloured with copics. The nest is shredded paper. Background paper is a sheet I have been hoarding from "Girls Paperie" and the white panel is a Sizzix embossing folder. Although it is very difficult to see there is a very fine green heart with wee pink flowers on it (Memory Box) surrounding the nest. Finished off with gold lace, a ton of pearls, ribbon, and the punched word "Spring".
EASTER GREETINGS
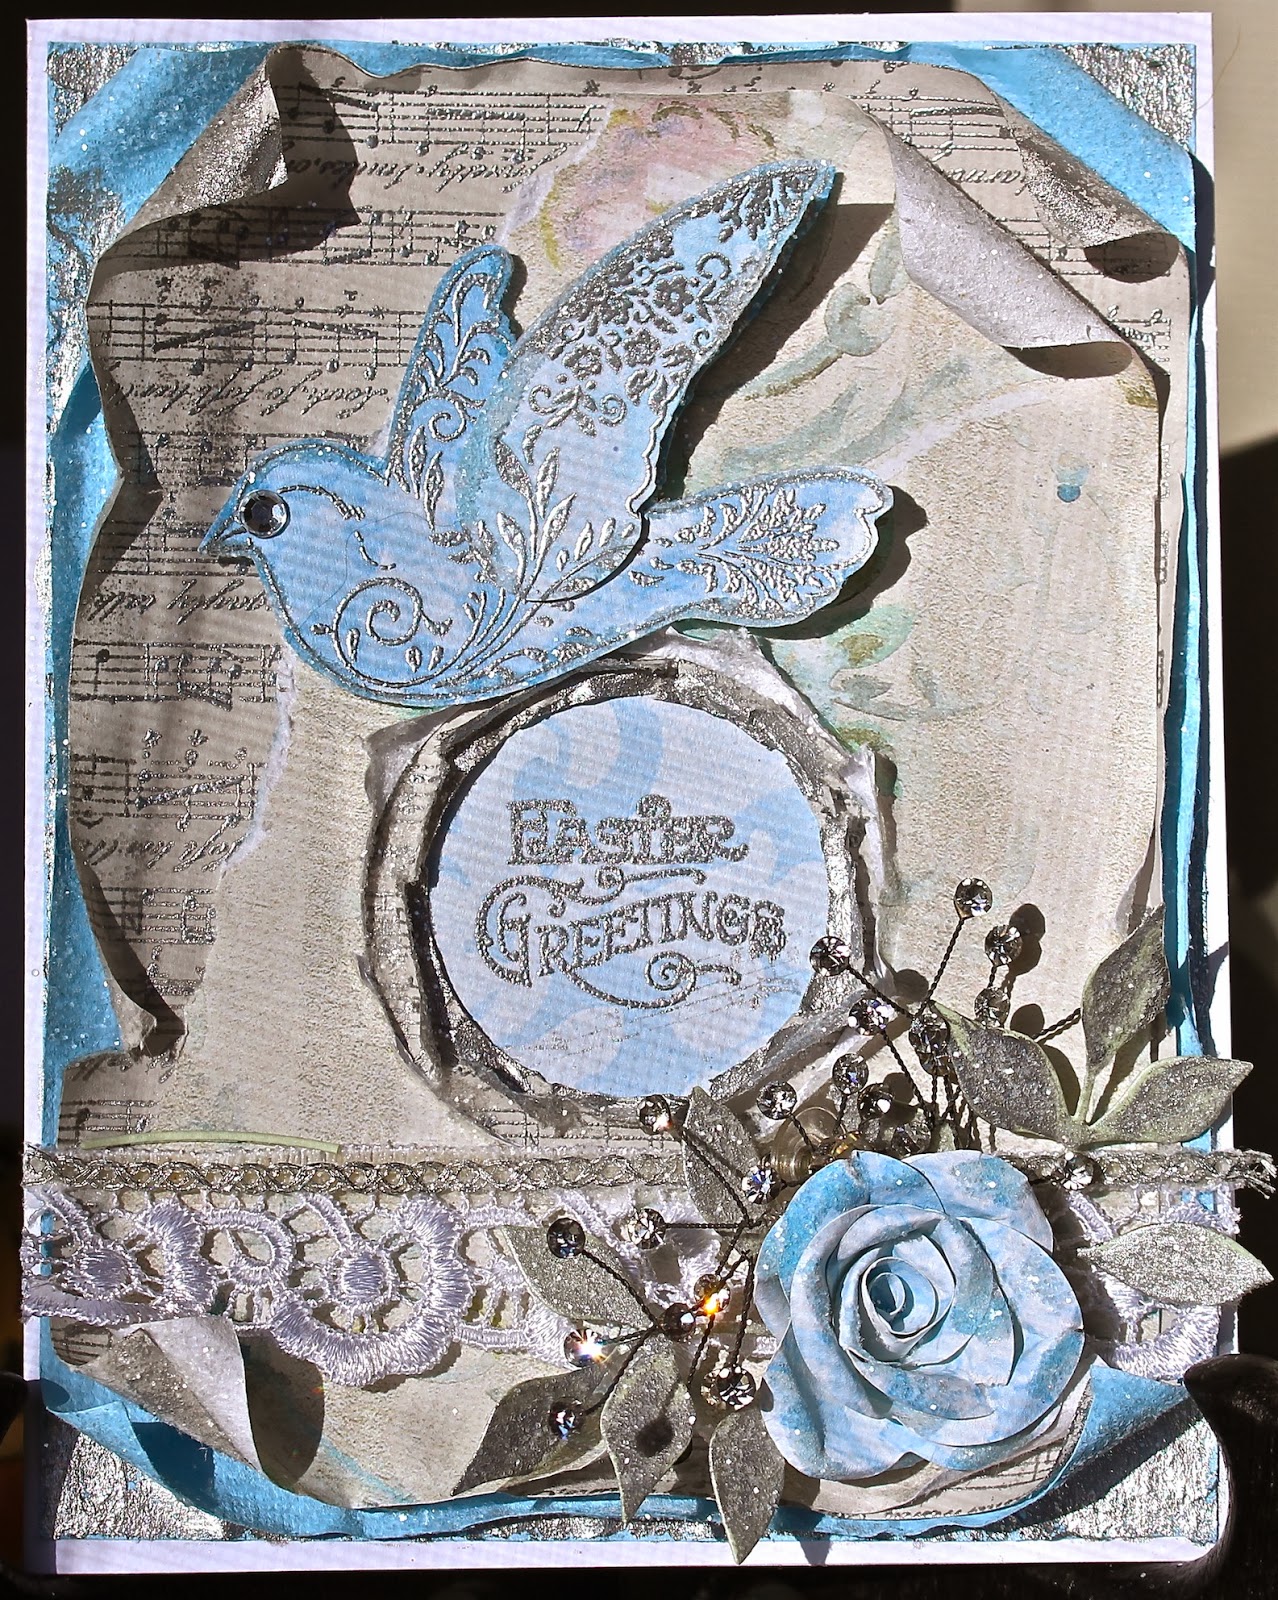

This one started with cutting (from the bottom) each layer of background paper 1/4" smaller then the one below.
1. white cs
2. Crafty Secrets "Classic Damask Blue"
3. grey cardstock stamped and embossed in silver (stamp "Anna Griffin - All Night Media")
4. Crafty Secret paper torn across top left corner (same paper set as the Classic Damask Blue.
The sentiment "Easter Greeting" was stamped and embossed in silver (Crafty Secrets "Happy Easter") The circles surrounding the sentiment were cut with graduated circle dies (Spellbinders) getting larger from the bottom up. All edges were heavily distressed (Tutorial follows). The paper for the rose is Blue Damask and the leaves are Memory Box painted silver and flower and leaves are glittered. The bird is from the Crafty Secrets "Cupcake Party". It is stamped twice with silver ink and embossed. I cut the wing from the second image to pop up the front wing and glittered the edge. To finish I added lace, silver braid, and a rhinestone eye.
HAPPY LITTLE BIRDS

Same as last card with 3 colours of paper heavily distressed. The main image is from Crafty Secrets "Birds and Blossoms" and the manuscript page is from CD1. I used Spellbinders "Grand Peony" for the flower. The leaves are a Marianne die with the edges sponged and glittered.
TUTORIAL

When distressing the edges you must start by breaking down the cross fibres in the paper so it will shape as you want. I started with all my paper cut to size and used a bone folder on the edges at least 3 or 4 times. After that many times the paper starts to delineate on it's own. To help it in places where it hasn't separated in layers just put your thumb nail between the edges and help it along. I like to work with a strip at least 1 inch in from the edge. Now make a few little tears or nicks along the edge (randomly) and roll the paper at the tears. Roll the corners the most. Never roll the corners exactly the same, remember aging or distressing is random. On these edges I didn't want any more than one edge of each colour showing so I tore away the underneath layer on each sheet leaving only a thin piece to roll. I also sponged Distress inks (Shabby Shutters, Wheat, and Old Rose) on the edges and painted glue and then glitter on. The glue holds the rolled edges in place. I hope you have found this useful. At some later date I'll do a tutorial on the flowers.
Please come join our March Linky Party where you can add a sample(s) you've created using any of our products and receive a $6.00 Coupon and 1 random.org winner will get a $50.00 gift card!
Thanks for visiting Paper Pass Times.
Make sure you visit the rest of the Design Team.
Cheers, Elizabeth
What beautiful cards Elizabeth! The detail on each of them is wonderful and the way you have explained how you distress your paper. I`m in love with how you did your Spring Chicks card and your card with the birds and big peony!
ReplyDeleteThese cards are stunning! I have such admiration for the delicate hand you use in your work. Each element is just perfect. Great tutorial, too! Have fun on vacation!
ReplyDeleteLove all the details and textures! Love how you distressed the papers. Thanks for a great tutorial!
ReplyDeleteLovely cards Elizabeth and thanks so much on the distressing technique tutorial, will definitely give that a try! Deb
ReplyDelete